Since a lot of folks are coming to the blog for the very first time, I thought I’d write up a welcome post.
I’m Tara, aka the scary doll person. This blog will focus mainly on 1:6 scale (aka 12″) vinyl collector dolls and action figures, and 1:6 scale dioramas and miniatures. I’m not so much a collector (my collections are limited to Monster High Ghoulia Yelps, and Barbie Collector dolls with the “New Hispanic” head sculpt, aka “Tango”) as Imam a customiser, and I take great joy in doll-geeking with members of the fashion doll community!
For a more in-depth look at how I became a scary doll person, check out Part 1 of my origin story here. For some of my work, check out the links at the right for my Flickr photos and etsy shop!
Rebodying, arm-swapping, boil perms, boil-straightening, haircuts, dye-jobs, rerooting, enhanced facial screening, partial repaints, and complete face-ups—I admit, I’ve done it all.
I’m confident about some of these (I can’t remember the last time I snapped a neck bolt), have a steep learning curve with others (my first Hasbro Jem face-up was laughably terrible) and scared silly about others (reason #1 why I sent my Empress Josephine head out to my dolly friend Sal to partially reroot: fear). As a customiser, I look at most produced dolls and action figures as blank slates. It’s very rare for me not to rebody, redress, and restyle a doll. It’s part of putting my own stamp on her—whether she was mass produced playline, or a limited edition collector item. As a result, 99% of my fashion dolls are Frankendollies. Parts, as they say, is parts.
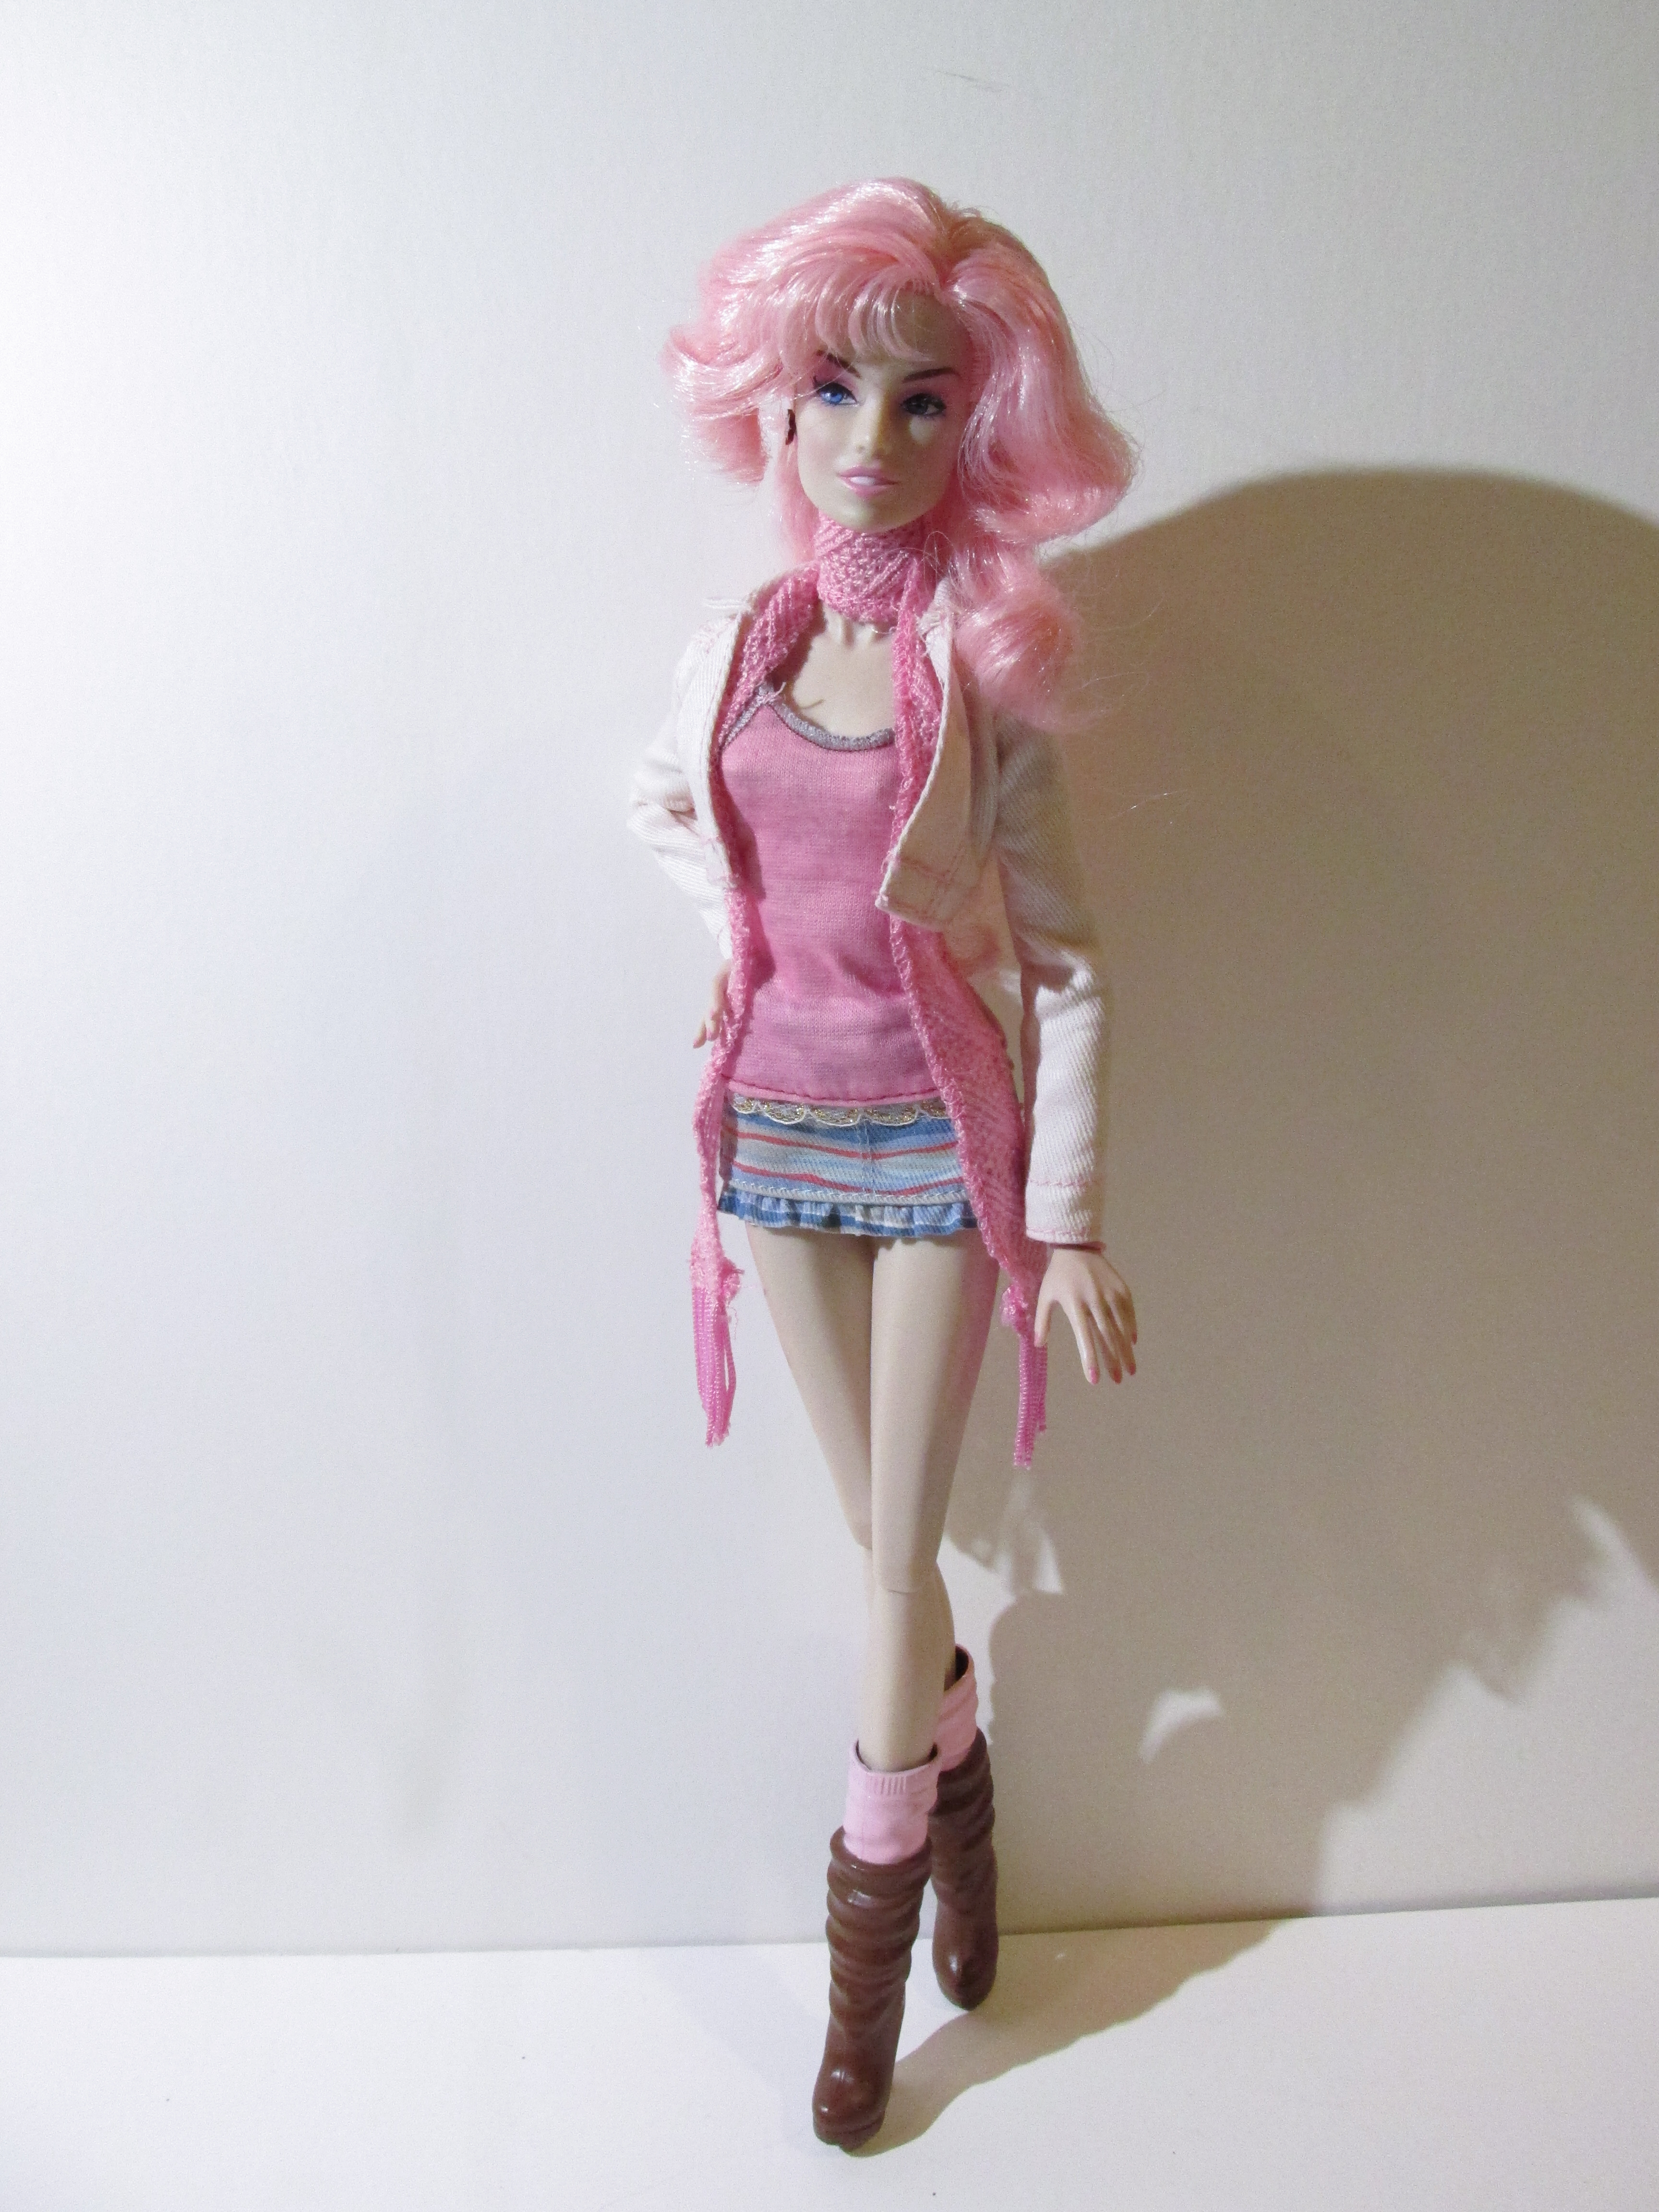
See this Broadway Magic Jem doll? I did many, many things to this Broadway Magic Jem doll. And you can too… if you want to!
But even if I plan on displaying them in their packaged fashion, on the body they originally came with, very little stops me from washing and restyling hair. Yet lot of my dear dolly friends are hesitant to do even that much, so I thought I’d share some simple tips on getting the most out of your dolls, if you’re willing to lose the fear of “ruining” a doll.
First off, no matter how limited the edition, no matter how rare the doll, no matter how carefully she was packaged and stored, the fact remains that some sprucing will need to be done prior to displaying a doll. And most sprucing will not “ruin” a doll. Sometimes all this means is combing hair and using a light spray of water to tame fly-aways. Other times, it might mean snipping a loose thread here or there with embroidery scissors, and perhaps tightening up a loose knee joint with a dot of superglue.
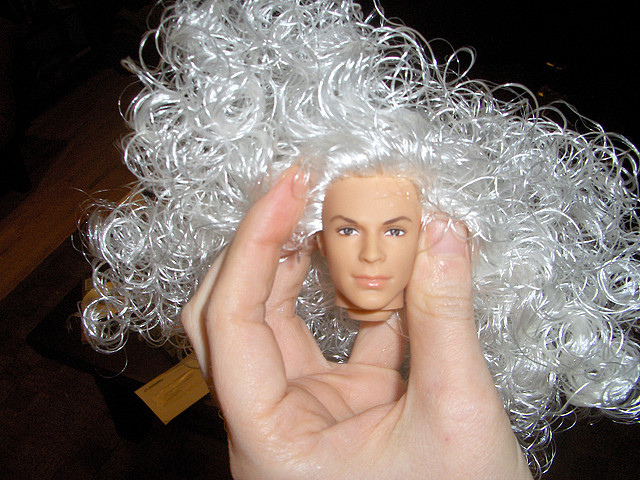
You can do this. It is not magic! Just learning a few tips and tricks, and gaining confidence through practice. I have faith in you! These plastic people are, after all, made of plastic. Vinyl dolls do not mind if a straight pin is poked through their head, to secure a wig or a hat. Just don’t poke the end of the pin through their faces—though even that is not a complete disaster, as vinyl will close right back up again with a nice soak in an egg cup full of hot water. Remember: Dolls feel no pain! They barely notice if you use a spooly brush to style their applied lashes, or even use a cotton swab dipped in rubbing alcohol to remove a stain.
The truth is, most vinyl fashion dolls are studier than you think. That’s not to say treat a collector doll the way your 3 year old granddaughter treats her playline Barbies, and drag them along through the world by their hair. Buuuuuut, if you open up a box and wail because the back of the doll’s hair is squashed flat and frizzy, or there’s a stain on her wrist from a bracelet… all is not lost!
For simple fixes, I suggest practising on an inexpensive Playline doll first, until you’re comfortable enough to try it with one of your darlings! Practice, practice, practice!
Washing fashion doll hair
Fashion doll hair is plastic. It does not need 99% of what human hair does. Most collector dolls are rooted with Saran hair, which is shiny and heavy and takes curl very well, and will not frizz under extreme heat. It can be washed with mild dish liquid or hand soap, in cool or even warm water, without losing its style. For curly girls, I recommend cheap Suave conditioner, because it has lots of “slip” and you can easily detangle curls with the prongs of a metal fork without the curls frizzing.
(I know what you’re thinking. Tara, this is madness. But take it from someone who has detangled a dozen or so super-frizzy Hasbro Stormer dolls from the 1980s whose hair had actually frizzed into dry locs: it works. It is not magic, but it is very very like magic. The curls stay factory-fresh, and even when the hair is dry, can be fluffed with the metal fork for volume without frizzing.)
Rinse thoroughly, and allow to air dry. For curly girls, drying inside a hairnet (which many dolls come packaged with) will help the curls retain their shape.
Styling hair
Doll hair can be styled while damp, or you can wait til it’s air-dried. Do not dry with a hair dryer unless you’re really really good at it, because even Saran hair will frizz under high heat from a hair dryer. If you need a little extra hold, I recommend an alcohol-free styling gel, such as Garnier Fructis. Also, I’ve found that by rinsing cheap Suave conditioner very nearly out, but not entirely out, the conditioner acts like a styling product once dried. Likewise, you can fill a spray bottle with a water down solution of gel and filtered water, and use that like hair-spray.
Washing vinyl doll bodies
I’ve had the best results with Target brand cleaning wipes on both hard plastic, and porous vinyl bodies. Whenever I get a used doll, I always give her a good scrub first with generic Clorox wipes. For the facial screening, you can use hand soap and a soft toothbrush, without damaging the facial screening. Rubbing alcohol also removes most surface stains that have not soaked into the porous vinyl! Just keep it away from applied lashes, as it will dissolve the adhesive. This is actually useful, if you want to dissolve adhesive, mind you. But if you don’t, just make sure you’re careful with your cleaning. I also will use a water and bleach solution if necessary, to de-mould a new-to-me head, when I’m restoring a vinyl doll.
Stains on the body
Undress the doll, and use a cotton swab to apply a thick layer of cheap benzoyl peroxide blemish crème on the affected area. Do not apply over facial screening, as it will damage it. Leave the doll under a bright light or in a sunny spot near a window for a week or fortnight. Wash off the dried crème, check the area, re-apply as needed. The crème will draw out stains from the porous vinyl, without significantly lightening the vinyl. This is particularly useful for the soft vinyl heads. I use it, for example, to remove traces of red “lipstick” when I am repainting a doll’s mouth, as red can easily stain the vinyl no matter how careful you are.
When red or black dyes from clothing transfer to clothes, one fix is to line the inside of a glove, sleeve, or waistband with clear sellotape. That way, you can keep the doll on display without fear of further staining.
Customiser’s Warning: Magic Eraser is not actually magic
Magic Easer (i.e. Melamine foam) works like super-fine sandpaper: the abrasive takes off the very top layer of a surface, similar to Brasso (which is used by LEGO minifig customisers to remove decals). So this is not particularly useful for collector dolls, but it does aid customisers in that you can use it to sand away tattoos on hard plastic bodies, smooth away scratches and rough patches, and sand down seams on the legs and arms. Conversely, if you use pure acetone to remove a tattoo, the Magic Erasure can be used afterword to buff the area, to get rid of the wipe marks.
Advanced Tip – Rebodying
When a body just cannot be salvaged, it’s time to rebody on either an identical body from the same doll, or a upgrade to a new body with a matching skintone. Removing the head is fairly easy. Just warm the head (to spare applied eyelashes or hair the heat, use a hair dryer on low pointed directly at the neck joint and rotate it from side to side. Steam or hot water works as well, but don’t use on flocked dolls, and be aware boiling water or steam can damage hair fibres.) until the vinyl softens enough that you can slowly pull the head straight off the neck knob, while firmly grasping the neck in the other hand to prevent losing the knob inside the head, or cracking the neck. Barbie Collector vinyl dolls have tines to hold the head in place. These can be snipped off, to make putting a head on a new body easy. Integrity bodies don’t have tines, just the knob. If the neck knob is wiggly, wrap clear rubber bands around it to give it a little more support. As for colour-matching, if you do not know the name of the original doll’s body, ask around first.
For example, I rebody all my Mattel Twilight Victoria dolls onto Integrity Toys Eternal Love Bride of Dracula bodies, because the “Peace” Mattel skintone matches the “Porcelain” BoD bodies from IT. When I learned this, I told, well, everyone I’d ever met on Flickr. Because I’m not the only mad doctor out there, putting old heads on new bodies, and the like. Some doll groups on Flickr will have a colour-matching chart in discussions. Because Barbie Collector and Integrity Toys dolls have similar neck joints, this can work! But you have a lot of body options out there beyond Barbie and Integrity, if you’re looking for a drastic change. LIV and Obitsu bodies are also easy to come by, both on Amazon.com and Evilbay!
Advanced Tip – Touching up facial screening
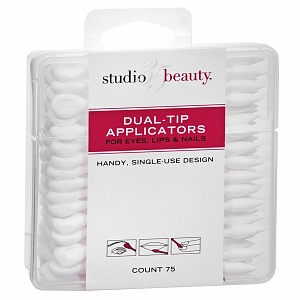
First of all, you’ll need these cosmetic applicators. Forget trying to use standard Q-tip cotton swabs; they aren’t firm or small enough for precision work. These are what you need. The pointy end is very firm, and you only need to dip the very tip in pure acetone, and then “lift” stray paint at lip-lines, remove bottom lashes, even fix dots of stray paint! Do not use the same swab for the entire job, as you might end up spreading paint around, and needing to clean it up with zit crème. I use a fresh swab for each gentle swipe. This is not for the beginner, but sometimes just cleaning up a ragged lip decal can make a huge difference, and save a trip to Patient Care for most dolls.
These applicators are also great for other jobs, too! I use them to apply Colorbox Liquid Chalks for blush, eye shadow, even to mute light eye screening (it doesn’t work so great on dark), and then blend the chalks with a make-up sponge to build up layers of colour. It’s a trick I learnt from reading BJD face-up tutorials, and I admit, I prefer it to trying to use chalk pastels. I’ve used this trick on two of my favourite Victorias, to tint her angry evil vampire-red eyes to a nice friendly hazel, without repainting the entire iris! The precision tip is great for this kind of work, and with practice, and a steady hand, it makes quick touch-ups a cinch! I use the blunt end for blush, and the pointy end for eyes. They’re also great for cleaning ears and noses—just dip the pointy end in rubbing alcohol, and switch out applicators until you get all the skin oils and dirt out of the tiny crevices.
Washing clothing
A 1/2 water 1/2 white distilled vinegar bath will wash most doll clothing. The vinegar smell disappears once the clothing has dried, and will help dyes remain colourfast. Also, vinegar will kill mould and mildew! If there is yellowing or stubborn staining, I will also use a drop of All free (no dyes or perfumes), and use a jar with a tightly fitting lid as a mini-washing machine. Shake, shake, shake for 15 minutes, then rinse with cold water, and lie flat and blot with a clean white towel, before hanging up to dry. However, not all fabrics are colour-fast, so you want to test this method first on a bit of cloth hidden from sight, such as the underside of a seam.
Dusting
I suck at dusting. No, really. Nothing like looking up at a shelf and noticing cobwebs starting to form between the doll and a wall to remind me that dusting is a weekly–not monthly–chore. However, I have been known to use my hairdryer on high, with the “cool” button down, to blow dust off my girls when they have been displayed on my shelves for long enough that they get noticeably dusty. Cans of compressed air (the kind you’d use on a computer keyboard) also work!
Redressing
The first thing I do when I get a doll is undress her, and store her factory-made fashion in a Ziploc baggie. This is because I am a crazy person. I have an entire storage shoebox full of Color Infusion/Jem sized shoes, organised by style, each in their own tiny clear plastic box. Mostly, it’s to keep fashions organised—even if I never plan on reselling the loose fashion. I have fabric bins with clothes organised by body type as well as manufacturer. That is how I roll. So when I get a new doll, one of the first things I do is pull out the bins of clothes that I know will fit that body, and play!
(That’s right, I play Barbies when I get home from work. It soothes me. If you knew what my day job was like, believe me, you’d prescribe an hour or two of combing dolly hair and fussing with dolly shoes, too.)
Now then… when I store a fashion, I always make sure that the hooks and eyes are together, the snaps snapped, and the like. This helps keep all the individual bits of a fashion from sticking to or snagging on the other parts. If the fashion has Velcro closures, press them together prior to storing, so nothing snags on the Velcro. A lot of the custom clothing I order from Etsy and Clear Lan has Velcro. Even high-end collector fashions have Velcro now and then, to preserve the silhouette of a fashion, and avoid bulky snap or hook and eye closures. Velcro is not a dirty word! Sometimes it’s the best closure for a particular design, and I actually prefer it for some doll fashions, for a nice close fit.
If clothes are wrinkled, I will sometimes press them very carefully by laying the fashion flat between the folds of a white cotton pillow slip, and ironing on the lowest setting. But test this method first on a fashion made from the same/similar material! So far, I’ve only done this on some high-end Barbie Collector fashions, and do not collect Silkstones, so I cannot guarantee it for those fashions. Use your best judgement. If the dress is one you’d send out to be dry-cleaned if it were 1:1 scale, then treat it with the same care you would your own clothes.
If you are putting on fishnet stockings, I find that toes on some dolls like Jem/CI and Monster High get “stuck” in the fishnets. So what I do is pull from the back, where the back seam is, rather than the front, and carefully allow give around the toes of the stockings right up until the waistband is at the waist. Also, when putting on shoes, I always angle the toes toward the top inner corner of the shoe. Big toe toward the opposite foot. Does that make sense? Gosh I hope so. Doing a YouTube video about how to put on shoes would make me feel, well… awfully silly. But I’ve found this method really does work, even works with plastic shoes! And you’re less likely to have issues putting shoes on/taking shoes off. Also, if the shoes are plastic, warming them up with either a hair dryer, heating pad, or in boiling water first will make putting them on/taking them off easy-peasy, and in some cases, will actually help the shoe more closely conform to the doll’s foot.
For fitting non-removable hands through sleeves, I will often grab a plastic sandwich bag and snip the corners off, to create little plastic “gloves” to cover the fingers. Saran wrap works too! This is incredibly helpful when it comes to the first generation of Pivotal Barbie bodies, such as Jazz Diva, Pop Life, etc. Barbie socks or gloves work too, but sometimes the pesky thumbs will poke through the fabric and still catch on jacket linings.
I will also use long tweezers to carefully pull sleeves down inside jackets, to keep them from bunching up around the elbow, and to show just the right amount of cuff.
I usually work from the skin out. So, tights or leggings first, then tops, then skirt/trousers, then jackets and coats, and shoes and jewellery last. If you’re layering, remember that doll clothes aren’t the same weight as human clothes, and the thinner the better, for layers closest to the skin. Clear Lan has fantastic tops that are feather-light and great for creating layered looks. So do some Playline Barbies. You’d be amazed what you can find in Playline options, especially when it comes to hard-to-find colours like white, black, and red. LIV clothes are amazing, when compared to Barbie, and can still be found reasonably cheap on the secondary market.
Jewellery
You will bend earring posts. This is a normal part of life. Do not despair! We all do it. And once the earring is in the doll’s ear, no-one but you will ever know the post has become a corkscrew.
But the easiest way to insert earrings is to use a large quilting needle to widen the teeny tiny earring hole, before inserting the post. Modern fashion dolls such as Integrity Toys and Barbie Collector do not have the same issues with Green Ear that vintage vinyl dolls sometimes have, so long as the posts are nickel-free, you’re good. However, if you’re still worried, you can wrap a bit of sellotape around the post, paint it with clear sealant, or just only use gold- or sterling silver-plated eyepins and headpins for earring posts!
Collector dolls can even wear thicker playline earrings! To tighten up the holes again after removing the plastic earrings, fill an egg cup with hot water, and let the head sit in the cup, for the vinyl to reheat and shrink back to normal size. If you’re worried about the hair, you can wrap the head in plastic wrap first.
Necklaces will always tangle around hair. It will always be a problem. No-one has ever found a way to keep that from happening, so far as I know. But you can dampen down hair with a quick mist of water (or just smooth it down with a damp hand) before putting on jewellery, and that will help make your life 300x easier, before trying to work teeny tiny necklace clasps. Also, there is no law that says you can’t twist the head around like the girl from The Exorcist first, to clasp a clasp. Also, I’m a fan of using a clear rubber band harvested from deboxing Playline dolls (or just from the your local drug store, which will sell hundreds of the little clear rubber bands for less than $5) to hold a necklace in place and keep it from constantly turning around so the clasp is at the front and the pendant is at the back. Another trick is to tape the clasp to the back of the neck with a tiny strip of sellotape. The adhesive will wash off easily afterwords, and if not, try a cotton swab soaked in rubbing alcohol to remove any lingering traces of adhesive!
In Conclusion…
There is a lot you can do with very little actual risk to the doll, to get the most out of your vinyl fashion dolls! it just takes practice, patience, and faith in your own abilities. No-one expects you to leap completely out of your comfort zone right away. But you can do little things like washing hair, or redressing, to work your way up to changing a doll’s look from top to bottom! And yes, there will be mishaps. But the best way to get over the sheer terror of “destroying” a doll is to realise that short of setting a doll on fire, nearly anything can, in fact, be fixed. If not by you personally, then by another member of the doll collecting and customising community! So debox and display with confidence!
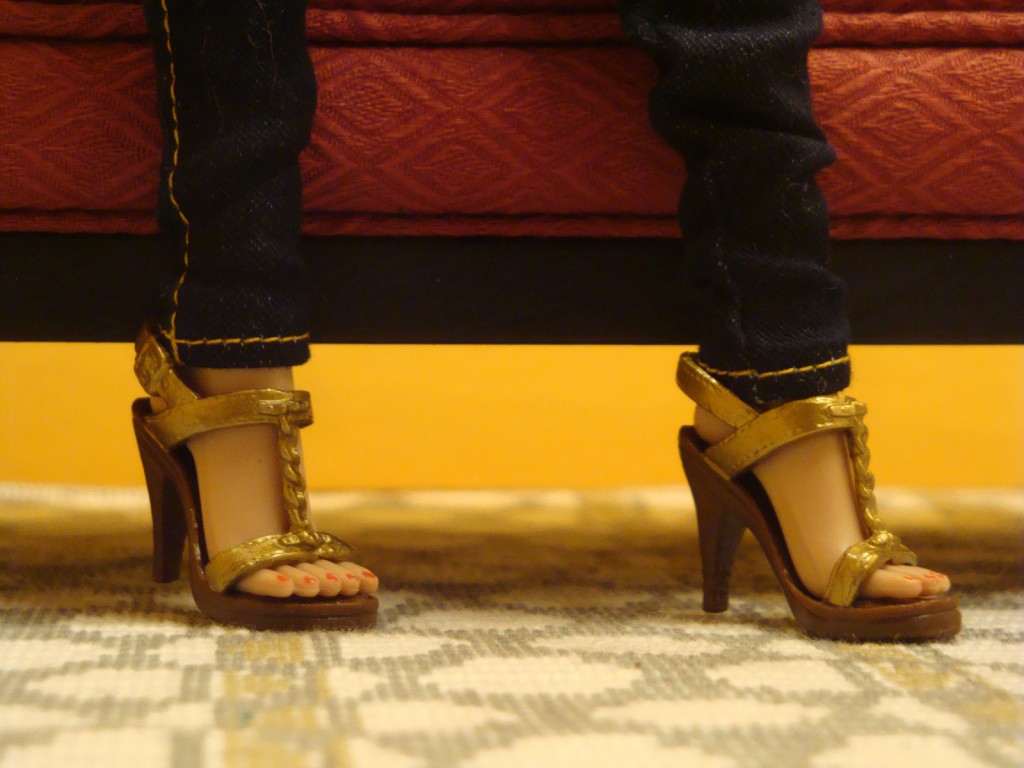
I’ll be honest with you all: the teeny tiny itsy bitsy wee ickle Barbie and FR feet make me twitch. I know that it means I can find 101 shoe options for those bodies, but I can’t help it. I love the larger, more proportional hands and feet on my Jem and Color Infusion dolls.
But Tara, I hear you say, where can I find shoes for them? It’s true, the shoe options are limited. Integrity has simple pumps that are packaged with each Jem doll in a variety of colours (including a half dozen different shades of pink), and has sold two Color Infusion Style Lab shoe packs at the last two conventions, as well as CI fashions including shoes and boots. But that’s still not a tonne of shoe options.
However, if you’re willing to look at Playline shoes, this widens the pool of shoe options considerably! Here are some shoes that you can find on the secondary market that, while not always a perfect fit, do allow for more redressing possibilities for your Jem and CI girls.
Currently on the market are Hasbro WinX and Mattel’s Monster High. The upside is that these shoes are vinyl, and can be softened with boiling water to conform better to your dolls feet. The downside is that the styles can be a bit too outrageous, even for the truly outrageous Jem girls. However, the pumps and sandals offer a good fit, and can be paired with tights or stockings for an even better fit in the heel. Also, the open-toed shoes fit very well, though the CI toes peek out a tiny bit more than the Monster High Ghouls.
Second option are discontinued lines like Mattel’s Stardoll, MGA’s America’s Next Top Model, and Spinmaster’s LIV. LIV can be tricky, but the pumps in particular work beautifully, even if you do need to use the boiling water trick for them. Likewise, Stardoll boots and ANTM sandals may be my ultimate fave, as they are chic, fun styles that are more complex than WinX or LIV.
Lastly, Sherry Shoes from China are beginning to release shoes designed for the Jem/CI feet that are right up there with Integrity’s shoes for design and quality, however they suffer at the moment from poor fit. The slouch boots are an entire centimetre too long (think of it like this: would you wear boots that extended 5 inches past your toes?) and the pumps can be too wide in the heel and similarly a touch too long to fit tightly, or have heels that are too long for the dolls to balance and stand without a doll stand. While this is not an issue for everyone, caveat emptor.
However, as these bodies have only been on the market for the last 3 years, here’s hoping that we’ll see more and better designed alternatives crop up in the future.
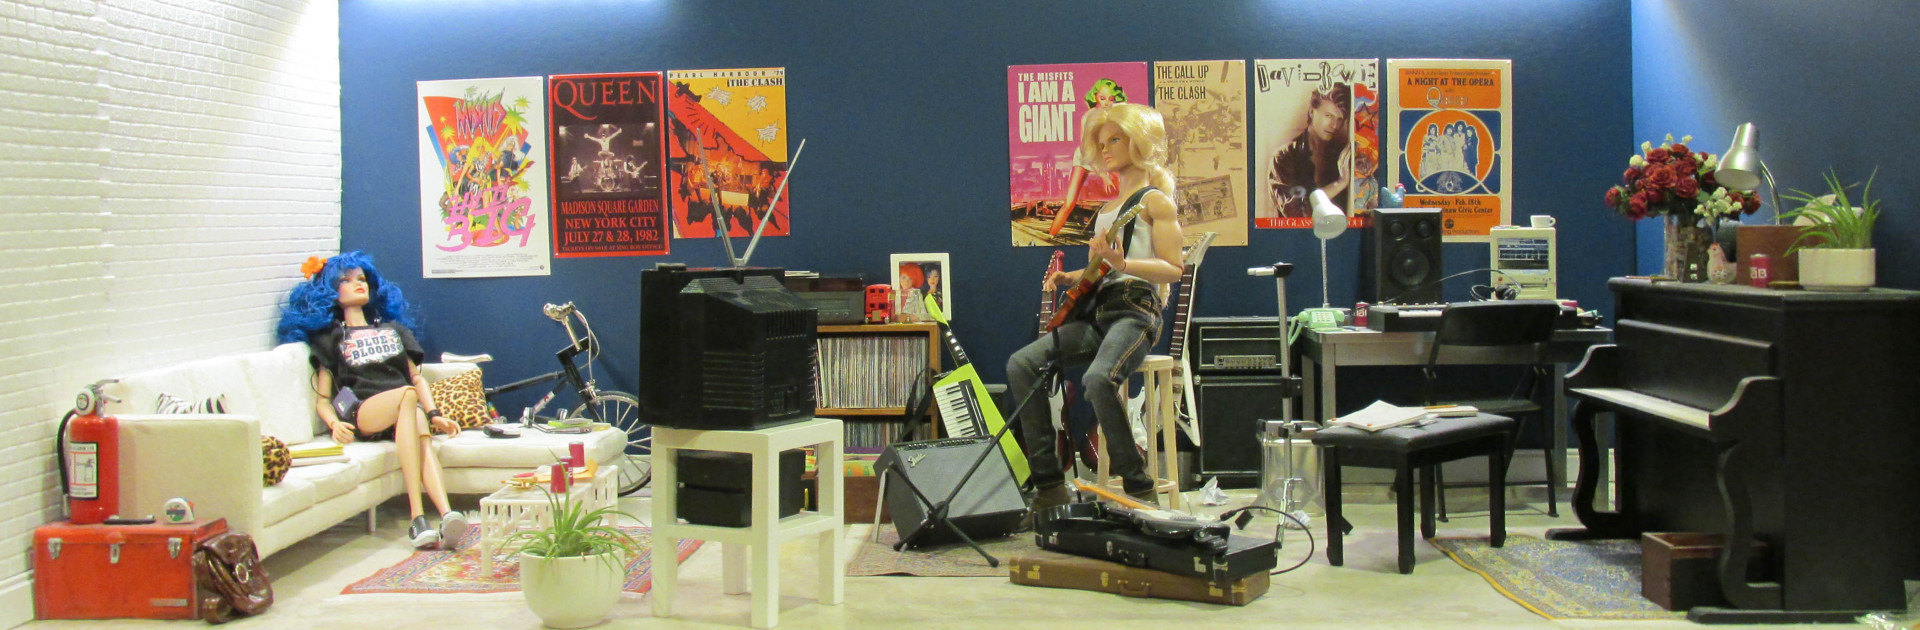
So, you want to start making fashion doll or 1:6 scale figure dioramas. Here’s a short list of Tips & Tricks that I’ve learnt the hard way, back when I started making dioramas. Learn from my mistakes, and benefit from my failures! For why should all of us suffer? Learning should be fun!
Selection of catalogue images I downloaded, before I started work on my Victoria’s Bedroom diorama.
Google images. Browse catalogues. Those free booklets you can find in the paint section of your local Home Depot are amazing for giving you ideas about colour! Check out your local IKEA for their awesome 1:1 scale dioramas. Build a folder of “inspiration” photos of 1:1 scale images of the sorts of room you want to design.
Pay attention to colour and light.
Think about architectural features you can add, beyond 3 walls and a floor. Think about simple things that don’t require you to have a masters degree in architecture and interior design–like how a bent wall can simulate a skylight, or how a white chipboard gift box can be used as a pillar. How cheap RE shelves from Target can create different levels or steps, ledges or dividing walls.
Contemplate the colour palette of your diorama, from the walls to the furniture and where you can add pops of colour (either in furnishings, miniatures, or even an accent wall in a different colour) to draw the eye. Try and keep decor within the same colour temperature; i.e. cool jewel tones or warm earth tones. Part of what pulls rooms together is colour temp–it’s something people may not be able to name, but their brains recognise when they see something that doesn’t have the same colour temp as the items around it.
Likewise, think in terms of composition the same way you would a photograph or a painting. Having an entire room in white and grey, a single pop of ruby red, or teal will make a statement. So, what statement do you want to make?
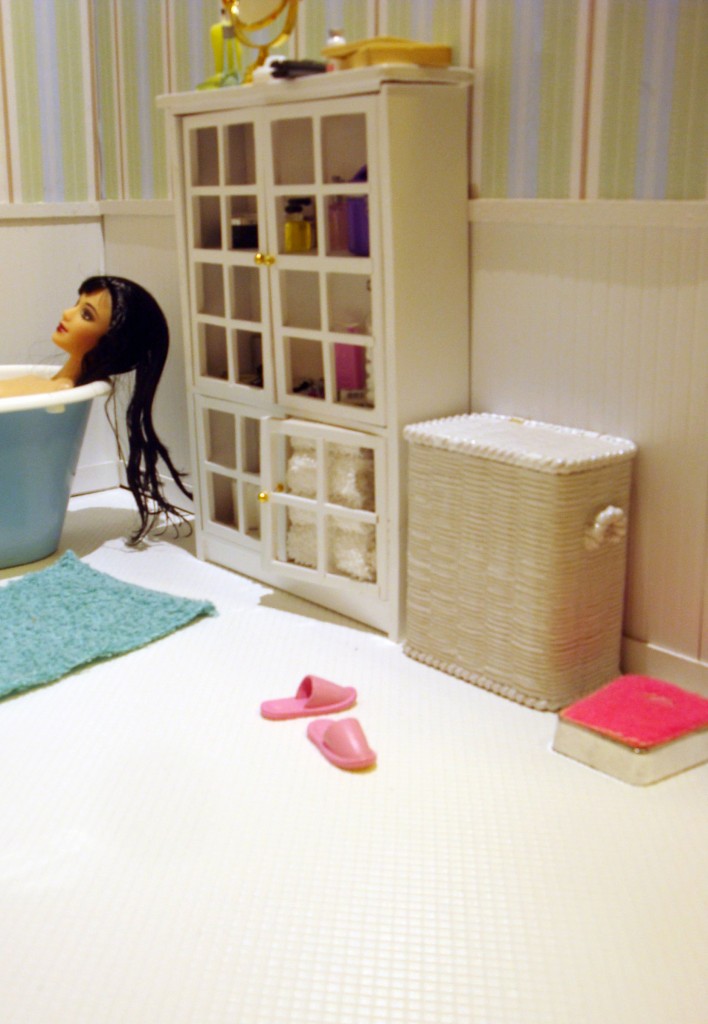
Textured vinyl shelf liner or contact paper is perfect for simulating a white tile bathroom floor.
Contact paper is AWESOME for flooring. You can find it online in a variety of patterns and textures. “Butcher’s Block” for example makes for great hardwood floors. Textured vinyl contact paper can work for a 1:6 scale tile floor. And it can also simulate poured resin floors. Check out the selection both online and in your local hardware stores, to see what’s out there. You may not even need to mount it on foamcore or bookbinding board. Sometimes you can just unroll it and weigh the ends down to keep it from bubbling.
If you plan on repainting 1:8 (Playscale) or 1:6 furniture, take a trip to the hardware store for some $3 cans of spray paint that bonds to plastic. Krylon Fusion is often recommended, but the Home Depot brand works just as well, and may have more colour choices. Also, grab the shade you think you want, and one shade lighter and one shade darker, because once you get back to your digs, you may discover that what you’re envisioning may well be too dark or too light depending on the light in the area where you’re constructiing your dio.
When repainting furniture, take it apart first (if you can) and paint the pieces in several very thin layers, allowing each to dry between applications. If you get drips, you can remove the paint while it is still wet with rubbing alcohol, available at any drug store such as CVS, Walgreens, etc. Also, if you’re using vintage pieces where the plasticisers have migrated to the surface, causing ugly yellowing, try either sanding the piece with Brasso on a soft cloth, or a Magic Erasure. Or just give it a light coating of paint the same colour as the plastic.
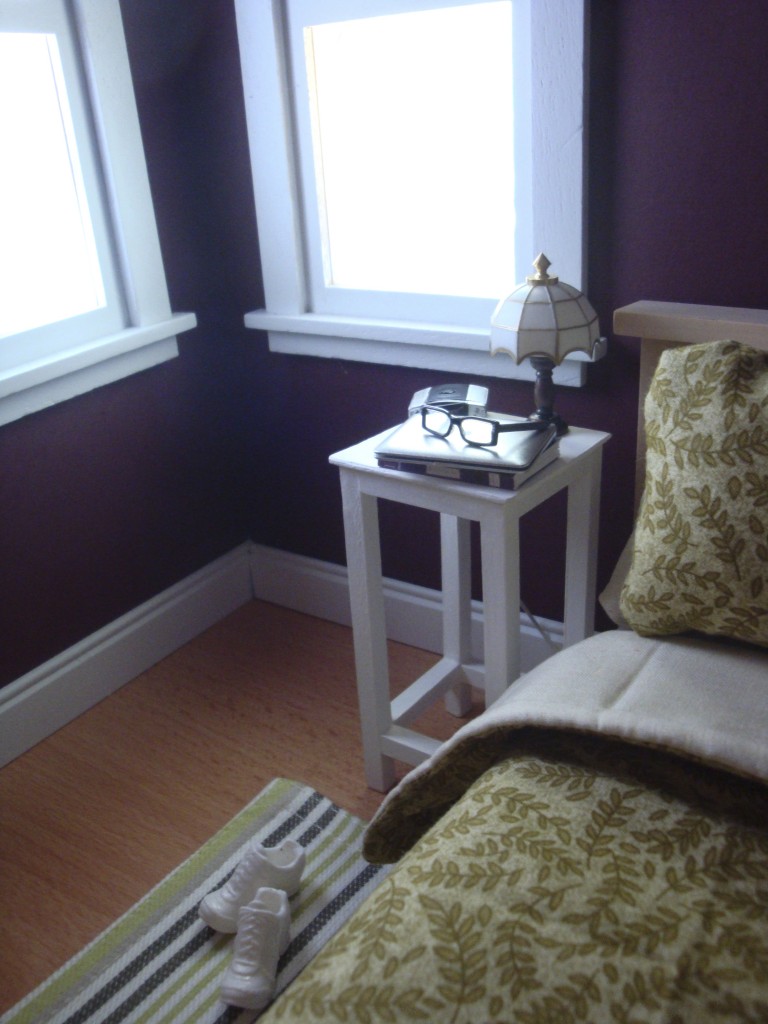
Full-spectrum lights behind the windows create the effect of sunlight.
Speaking of lighting, full-spectrum lights are your friend. Especially if you don’t want to spend an hour white balancing your photos to remove the yellow that incandescent bulbs will give you with a digital camera. Also, IKEA sells all kinds of LED lights that put off very little heat and can be used with great effect as ceiling lights.
You have a lot of options for your walls! I personally prefer Crescent brand mat board because it has some texture (which helps when photographing, to reduce shine and glare) and comes in a wide variety of colours. You can find it at Blick, and a 32″ x 40″ sheet can be cut into thirds for an additional $.50 and BINGO, you have your back wall and two side walls. But foamcore is also very popular, and has the added advantage of being easily painted using spray paint. Likewise, for smaller dios, you can get a pack of 4 sheets of 15×20″ bookbinding board for $20 and it can be covered with fabric, scrapbooking paper, or contact paper for walls and floors. All three are relatively easy to cut with a ruler and X-acto knife, to create holes for windows and doors, and you can create hinges using tape.
Green Painter’s Tape is your friend. It’s low tack, can be used to attach posters, mirrors, magnets, or any other wall art you need to your walls, and removes without leaving sticky residue or ripping the surface of mat board, so you can reposition pieces easily, and reuse them. Glue dots are also useful, but make sure you get low-tack ones, and throw the unused dots away after a few months as using old dots to attach trim such as baseboards or door frame trim can rip the surface of your dio walls if you try and reposition/remove them.
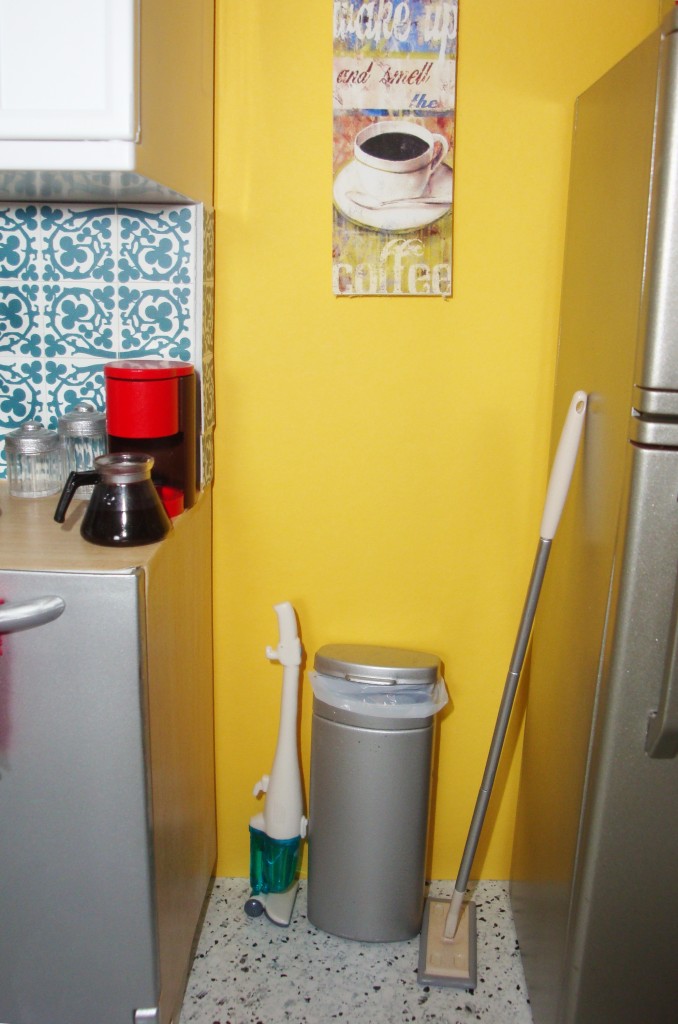
This kitchen rubbish bin is a plastic Mentos gum container which has been painted silver and lined with a bit of bin bag, for realism.
A small mitre box is perfect for trimming your wood baseboards, and other basswood pieces, and can be found at most craft stores or online for less than $10. It’s especially useful for cutting trim at a 45° angle for door and window frames, to give your dio a polished, realistic look.
The Structures & Furniture category of Ebay is great for some things, but remember than most Playscale furniture is smaller than you think it is. Sofas are really loveseats. Chairs may need to be raised up with legs made from dowels or blocks. Kitchen counters that are perfect for Blythe or Momoko will hit your Fashion Royalty dolls in the thigh rather than at her waist. Playscale doors from Houseworks will appear too short, next to your Hot Toys Wolverine because playscale doors tend to be 12″ tall rather than 14″ tall.
When looking for furnishings and miniatures, think outside the box. Check out trinket boxes, music boxes, and jewellery boxes for wardrobes, chairs, and more. Pill boxes make great jewellery boxes for your 12″ fashion dolls. Those cool acrylic nesting tables you’ve seen in contemporary/modern dioramas? They’re wholesale jewellery store risers and can be found on the cheap on Evilbay in the Business Industrial categories. Items from the stationary section of your local Target or Marshalls can be used as bookcases, end tables, and more. You can find bamboo silverware holders that can double as 1:6 scale bedframes. Candle holders and napkin rings make great bases for end tables. You can use drawer pulls for towel bars in bathrooms, or even fancy wall sconces. Start training your eye to look at things and see possibilities. Check out the housewares section of your local Target or WorldMarket for napkins and placemats to serve as area rugs, bedding, and more. They’re usually already perfectly scaled for dioramas, and you can really bring a room together with a simple placemat rug that echoes or compliments the colour of the walls or furnishings.
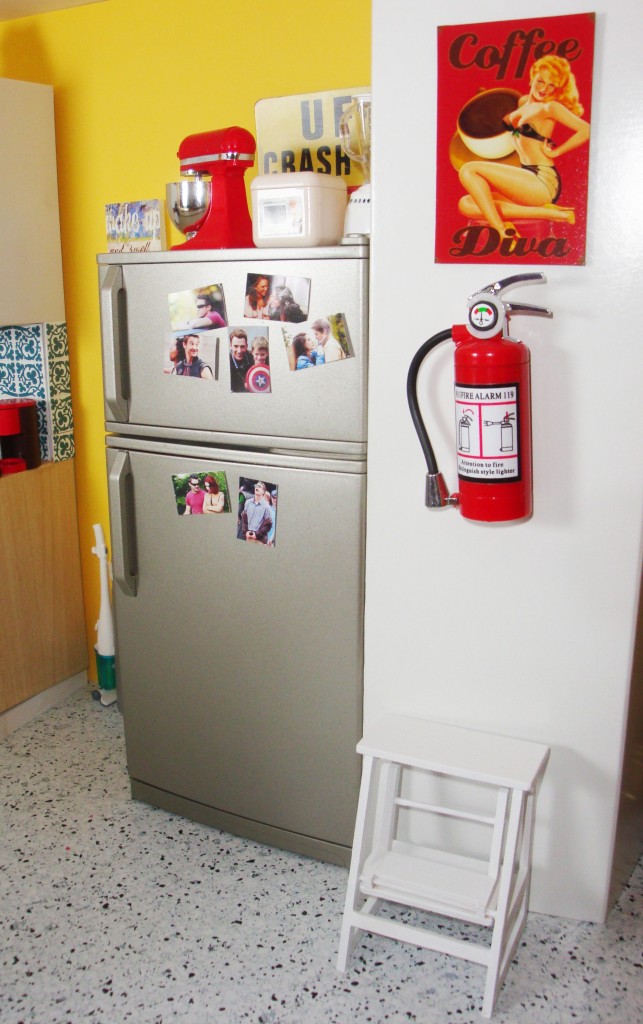
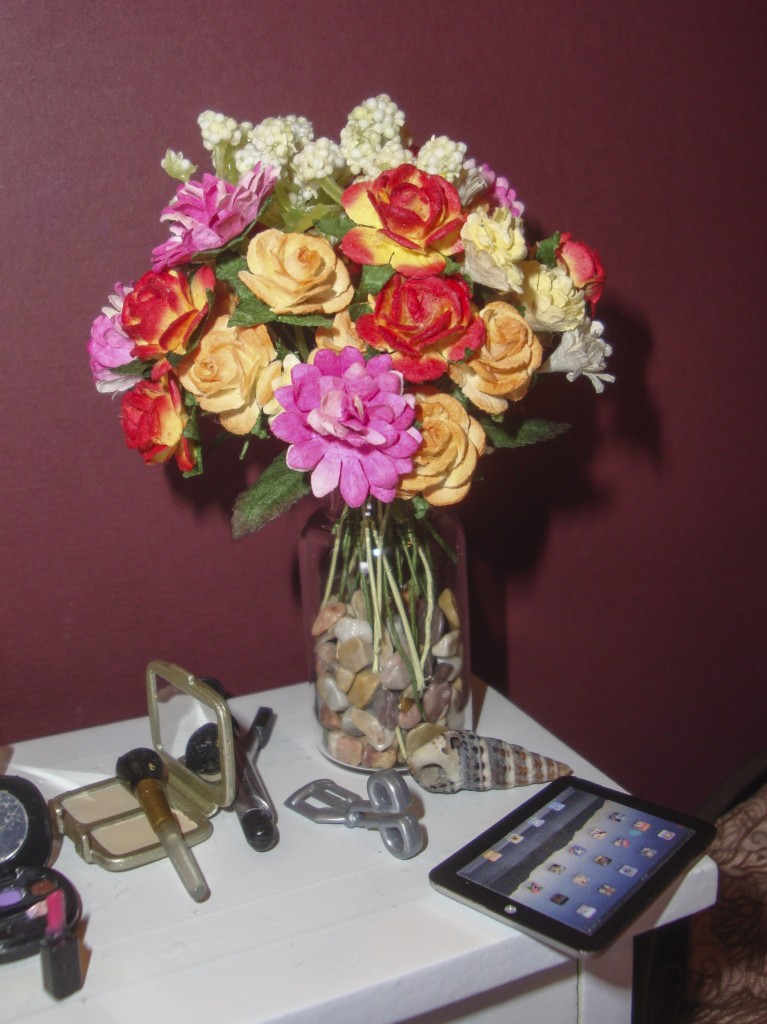
Candid photos of the Avengers, and tin signs (aka magnets) add a touch of Darcy Lewis’ personality to her kitchen, and tells you about the important people in her life.
Speaking of fabric that’s scaled for 1:6, Jo-anns sells fat quarters of 100% cotton quilting fabrics for $2 each and they are perfect for when you’re looking for fabric for bedding, throw pillows, wallpaper, and more. Also, they’re arranged by colour, so you can grab different fabrics in the same colour family with ease, for complementary looks instead of covering an entire sofa with the same print. They also often have sales, so never forget to grab the circular when you first enter the store.
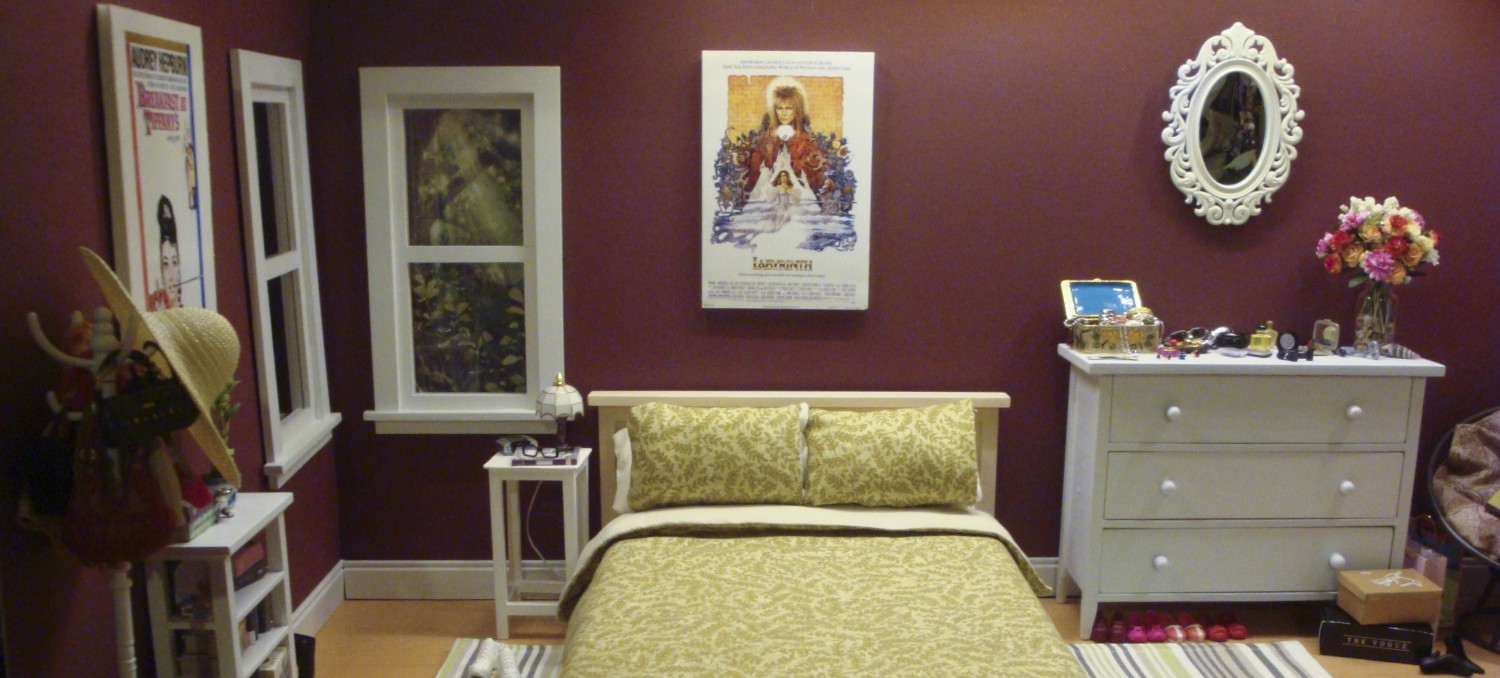
Think about what the room says about the characters you plan to put in it. Whether it’s a bedroom, lounge, or a kitchen, think about what story the choice of furnishings and miniatures says about your character. Pull all the minis you have that you associate with the character, but in the end, less is more. Only keep those minis that have something significant to say, and make the room seem lived in. Throw a jacket or a messenger bag over the back of a chair. A pair of shoes peeking out from beneath the bed. A mobile phone resting on a side table. Look around at your own home for ideas. Do you have a framed family photo on top of a bookcase or mantle? Artwork or postcards stuck to the fridge? How does your home reflect you as a person? Think of the same details you can add for your dolls or figures, and choose miniatures that fill in the story for your viewers. From the choice of magazines on the coffee table, to the colour of the kettle on the range, these are the ways you can visually tell your story.
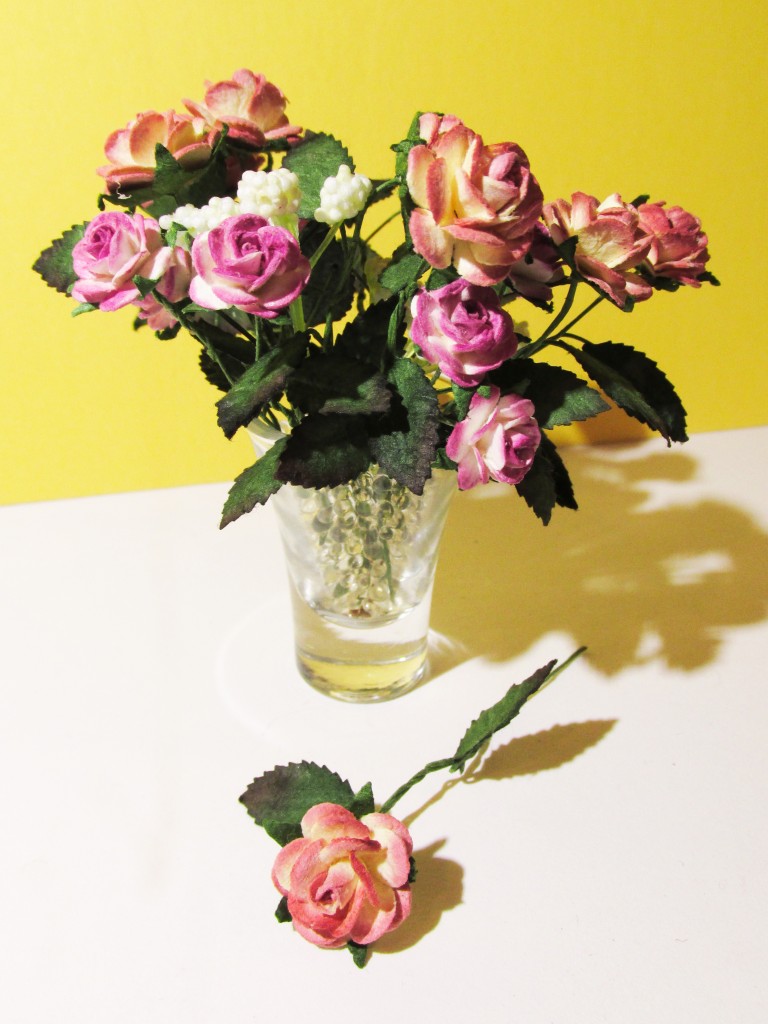
1:6 scale bouquet of 5/8″ and 1/2″ “creamy dusk” and “light magenta” Mulberry paper roses with oblong 3/4″ leaves attached by hand, arranged with pieces of plastic Queen Anne’s Lace as scale baby’s breath. Vase is a 15ml fluted shot glass, courtesy of OneSixthSense on etsy. Vase filler is 1:1 scale non-toxic polymer water pearls (dry, straight from package) from craft store.
I’ve been where you are. I’ve been stood in the silk flowers aisle of my local Jo-ann Fabric & Crafts, bemoaning the fact that even the tiniest silk gypsophila baby’s breath is still too large to work as 1:6 scale flowers. I have raised my fist to the sky and wept hot, wet tears that despite six full aisles of silk flowers arrange by colour there are so few options for miniature floral arrangements that work at 12″ fashion doll scale.
Well, mourn no more, fellow diorama artists! For I am here to tell you about the wonderful world of mulberry paper flowers, and how you’ll never have a complete meltdown at Michael’s again, cursing your lack of a fully-functioning shrink ray.
(I often curse my lack of a fully-functioning shrink ray. Primarily because while there are myriad affordable options for 1:12 scale and even 1:3 scale dioramas, 1:6 scale means having to think outside the box. And commissioning lots of pieces from people on etsy. All the time. And crying. All the time.)
There are advantages to mulberry paper flowers and leaves over silk/plastic artificial flowers. For one, due to the texture of the painted paper flowers, they photograph better. The way light reflects and is absorbed by the paper more closely mimics real-life flower petals, and the thin green wire stems can be bent easily, adding a touch of realism to your dioramas. For another, they are very inexpensive. For example, a bundle of 50 paper roses–available in multiple sizes from 10mm (⅜”) to 25mm (1″)–can cost as little as $5.00 USD. A wide variety of blooms can be found–from tea roses, closed rosebuds, gypsophila, daffodils, mums, and gardenias to name a few, allowing you to create bouquets and centrepieces with variety of both colours and types of flowers. Leaves in different shapes and sizes can also be purchased, and wound around the thin wire stems easily, for an even more realistic touch.
You’ll be able to find mulberry paper flower heads easily in the Scrapbooking Embellishments section of your local craft store, but for 3 dimensional open and closed roses and other flowers, you are going to have to resort to online sellers. Bulk orders can be made from craft suppliers such as Wild Orchid Crafts, Schokdiijung on etsy, or ebay sellers like MulberryCraftsUS.
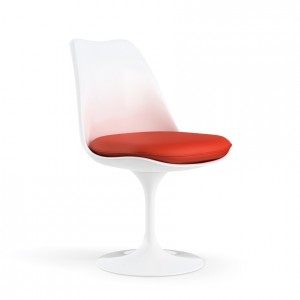
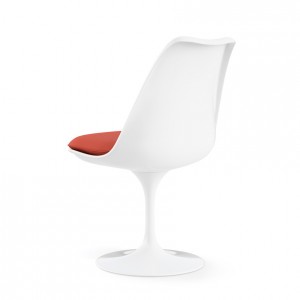
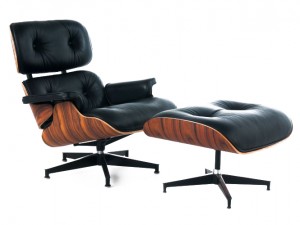
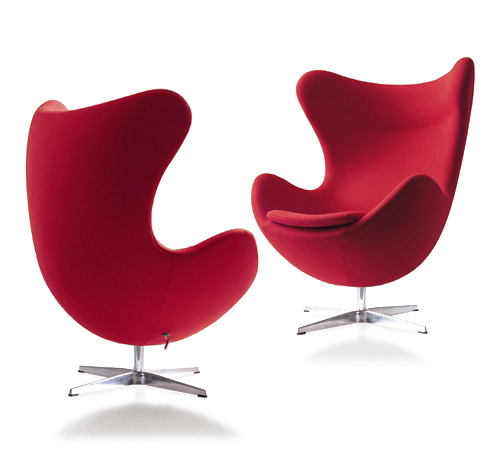
Eero Saarinen’s Tulip Chair (first seen in 1955 for Knoll) is a classic example of mid-century modern design. With its smooth, sleek lines resembling the petals of a tulip flower, it’s instantly recogniseable and is often grouped with the Jacobsen Egg Chair and Eames Armchair as top examples of industrial design.
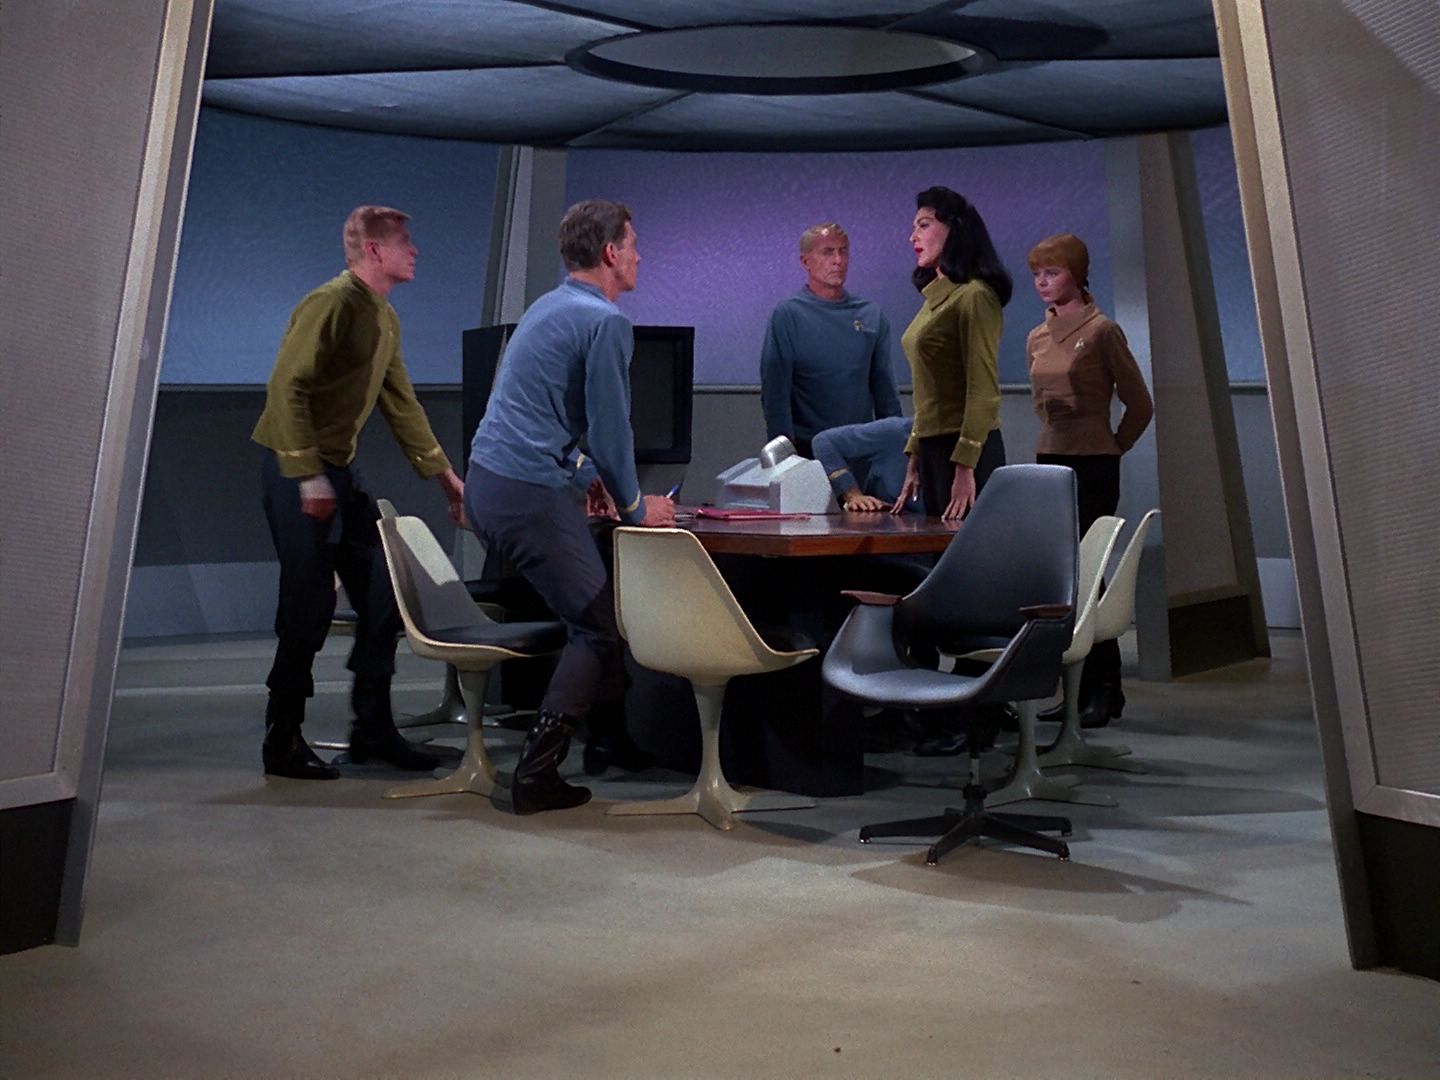
Of course, I knew none of this. Per usual, my introduction to the sleek, futuristic Tulip Chair was Star Trek. Below, check out a shot of Majel Barrett surrounded by a bevy of tulip chairs of different shades of white, grey, and blue as Trek’s very first female First Officer in the 1964 pilot, “The Cage” directed by the legendary Robert Butler.
When I began playing with the idea of doing a 1:6 scale Trek diorama, I wanted to meld the set design from the original series with the shiny new Star Trek (2009) film. The white and red tulip chair was a must-have miniature, but I was shocked to discover the only miniature available at the time was the Vitra Design Museum replica, which cost over $250. Needless to say, I passed.
However, the design is a classic, and I soon discovered a much more affordable 1:6 tulip chair available from Lexington Modern. Sold directly through Lexmod’s website, and on Amazon.com, I got several chairs with both black and red cushions for only $15 each during a sale. I’ve made a point over the last year to point fellow diorama artists toward Lexmod, as it’s a much better alternative to Vitra for a variety of reasons, not the least of which the quality of the miniatures for the price. A similar chair (possibly cast from the same moulds) is available wholesale from China for only $7. Check it out at Aliexpress.
So, next time you’re looking for modern minis, don’t despair! There are plenty of affordable mid-century chairs out there, if you’re willing to do a little digging! Sometimes they’re sold as mobile phone holders, novelty gifts, and decorative collectibles rather than doll or action figure furniture. With the same chairs often sold on ebay for $40 and up, I wanted to spread the word far and wide on where diorama artists can find their own tulip chairs without breaking the bank.
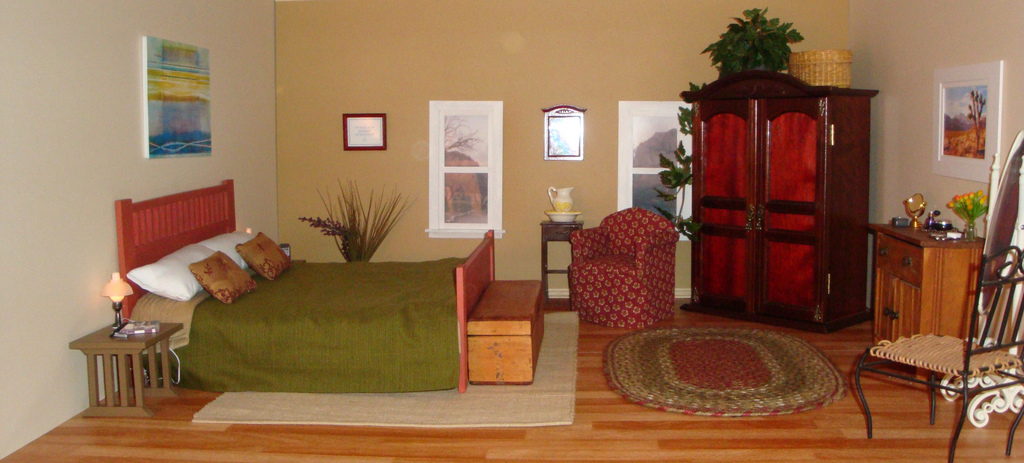
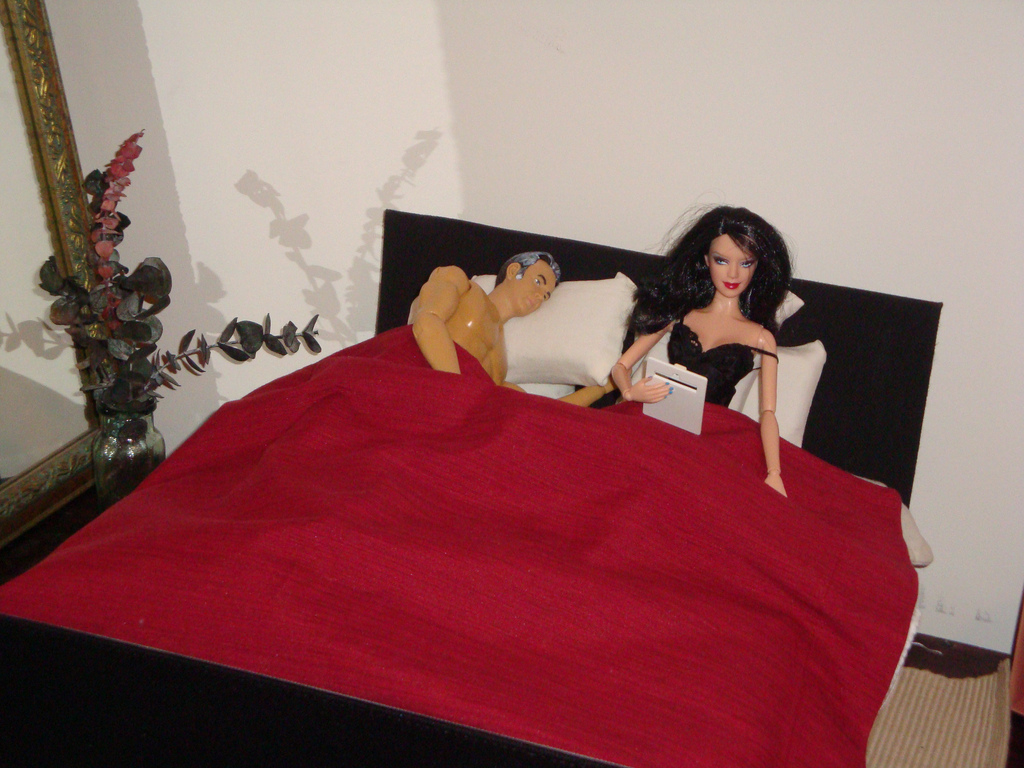
Dioramas sneaked up on me. By the summer of 2010, I was bookmarking dioramas on Flickr and trying to resist the siren call of 1:8 (Playscale) and 1:6 furniture. Then one fateful night, I kinda sorta accidently made a bed. I didn’t mean to! It just sort of happened. The frame was foamcore, and the pillows were pieces of cushion covered in fabric from a pair of opaque nylon tights. The beadspread was a piece of cushion cover I sewed to size while sitting on my sofa, watching telly.
For funsies, I mocked up a corner of my trunk like a bedroom, just to shoot silly pics of Captain Pike and Number One in bed, to share with some Star Trek friends. I thought it was over. I thought I could go back to my life of customising, and everything would be fine.
It was too late. I had been bit by the bug. In short, I had crossed the last self-defined line. I was now, officially, a scary doll person in my own mind.
Within two weeks, the “it’s not a diorama” diorama project was born. I did tests on my coffee table, and in Photoshop. I began amassing plastic Playscale furniture, discovering what many a diorama artist before me has learnt: Gloria liquor bottles are perfect, hilarious, and a necessity.
I also learnt my first real lessons in scale.
Did you know there’s a reason film and television sets are ¾ scale? It’s to make the actors look larger and more impressive, due to the way the camera flattens everything out. So having an Excel spreadsheet where you input real-world dimensions and get them automatically converted to 1:6 scale doesn’t mean a heck of a lot until you realise that Fashion Dolls have elongated, stylised bodies, huge heads, and tiny hands and feet. And that the real test of scale for a lot of things is the width of a doll’s palm. Because while 1” should be the equivalent of 6” in a 1:6 scale world, the truth is that ½” trim is what “looks right”. That 1/8 playscale furniture will be too short, if you want the top of a dresser or a kitchen counter to hit a doll at hip-height, but that dollhouse pitcher and set of mugs may look perfect in her hand. And that 12′ x 16′ master bedroom you’re creating? Will appear cavernous once you photograph it.
Oh, and American Girl furniture? Gorgeous and beautiful and completely and totally wrong in every way, no matter what the maths tell you. I learnt that lesson the hard way, and at great expense.
For example, I still have a set of 1:4 and 1:3 furniture that I didn’t realise was way too big until it was bought, paid for, and arrived at my home. I will not lie, gentle reader; those pieces are still sitting in a corner of my dining room, waiting for me to find homes for them. I still have bags of 1:12 scale plants that were dwarfed by my dolls. I have a California King-sized bed that is orientated the wrong way, because I did the maths wrong. I have 3 different pitcher and basins, five different wardrobes and chests of drawers. Bedside tables. Lamps.
By the end of September 2010, when I declared the diorama “finished”, almost every miniature in the diorama had been switched out at least twice. Dioramas, for me, became an exercise in “close, close, so close, almost, RIGHT!”
As frustrating and crazy as the experience was, I also found wonderful friends, as I posted Work-in-Progress photos on Flickr, and scoured Ebay and Etsy for pieces from June to the end of September.
I commissioned a custom Mission Style 1:6 scale California King size bed from the amazing Smidge, who delivered an amazing work of art. I met Partydolly, whose bright retro dioramas that popped with tropical colours were alluring and fun, and I cyberstalked Ro, whose dioramas featured architectural build-out features I could only dream of. Just getting foamcore from the Target was a lesson in how to walk a half mile home with a giant piece of posterboard against the wind.
In Chicago, the sale of spray paint is prohibited within the city limits (to discourage taggers). I don’t have a driving licence, so I begged a friend to hit up the Michaels craft store in Skokie to get me the obviously much needed Krylon Fusion paint that would magically bond to plastic. She came back with forest green, high gloss black, and a sort of khaki beige.
All of this was a HUGE learning experience in sourcing materials. It wasn’t just about surfing the Structures & Vehicles category on Ebay. It was about walking into the housewares section of Target and looking at a placemat and seeing an area rug. It was about finding a vintage wooden pencil box, and seeing a trunk. It was about spending hours looking at jewellery boxes and spice racks, to find the perfect wardrobe that looked like it could have been in the Pike family for generations, but was manly enough to be in a male 50-something Starfleet captain’s bedroom in his parent’s ranch house in Mojave.
I’d extended my storytelling from prose fan fiction to 3 dimensional miniatures. And once I finished the Pike ranch Bedroom (circa 2258 CE), I looked at everything from hardware stores to Hallmark ornaments as diorama shopping plazas.
Four years, many dolls, and two storage boxes full of Re-ment later, here I am. A very scary doll person with an expensive yet hugely satisfying new hobby. I’ve only created 4 “real” dioramas (i.e. with walls and floors and miniatures) but with each one, I’ve taken on new challenges, learnt via trial and error, had triumphs and failures, and lost what little storage space I had in my basement flat.
To promote JemCon, our con chair, Alysia Robinette, had purchased a dealer’s table at a local convention called “Anime Central”. At ACEN, I manned the table with another Jem fan and doll collector, Shevona McKenzie, and our co-chair, Melinda Rubbens. She had brought her dolls to display, and I had brought magazines and wore a sparkly pink Jem tee-shirt I’d got made at a local head shop.
Alysia, Min, and Shevona and I joked all week-end that my Stormer would not be my last doll. I swore up and down that I would become a “scary doll person” with a complete collection, custom dolls, and horror of horrors, dioramas.
Alysia knew me better than I knew myself.
Before long, I started redressing my Stormer in playline Barbie fashions I bought from my local Target. I had shown my sister the custom Riot doll that a collector named Tommy had commissioned, and her immediate response was “I want one.” I told her that Hasbro had never produced a Riot doll, but she was not to be swayed. She demanded that I make her one.
So I began the process of my very first custom doll–a Riot for my kid sister. A kid sister I should point out was 32 years old and a highly-respected history teacher at university.
I laboured for almost three years over that first doll. I experimented with different heads and bodies, finally settling on a Mattel articulated Ken body and Rebelde head which I rerooted very badly, but passably for a first-timer. It was also my first brush with Fashion Royalty, as I purchased a FR Homme shirt for him, only to be utterly shocked at the price. The seller filled me in on all the backstory of Integrity Toys, and I was completely baffled that someone could or would spend over $100 on a doll that wasn’t vintage.
(I can hear you laughing. I know! I was still a baby “doll person” and didn’t know better.)
The Chicago JemCon was held in September 2007, three years after my article was published. As head of programming, arranged an entire track of programming for the two day con centred on the Hasbro doll line, running parallel with a track focused on the animated series. There was an entire workshop dedicated to telling the different shades of pink shoes apart. I was bewildered, but figured we were all fans, even if the “doll people” seemed so different to me.
The con was a crash course in what I now call “fashion doll fandom”. There were displays of prototype dolls, long tables of customised Hasbro Jem dolls and kit-bashed custom Jem dolls created from other fashion doll lines, rerooted, repainted, and dressed in hand-sewn fashions. Christy was out sole “pro” guest, and had four panels where she discussed the entire process of the development of Jem, from Hasbro’s original ideas to the series’ cancellation following the doll line being retired in 1988.
As part of the 2007 con, we put up a website, and I was the moderator of the forums. When the Jem & Friends board closed, the collectors migrated to the JemCon boards en masse, and I remained active there even after I had to step down from the board and hand over moderating to another convention committee member.
Then, in 2009, Mattel released tie-in dolls to the new Star Trek film. I was a huge fan of the movie, and fell madly in love with the Uhura doll, which featured the Mbili sculpt. I started looking up every doll released with that sculpt, and started buying o In Style dolls, my first doll purchases that had nothing to do with fandom, and everything to do with just the beauty of the dolls themselves.
My first customs centred around Trek. I decided Uhura was lonely without her roommate Gaila, and started putting together a Gaila doll, using a Wicked Witch of the West Barbie as a base doll. Then Barbie Basics were released, and I was hooked. I learnt the names of all the sculpts, thanks to a fandom friend, Jan Fennick who was an authorised Barbie Collector dealer and had authored a book on Barbie collecting. It got to the point where I could name a sculpt without thinking, and Jan thought I was a little frightening.
(She still does.)
I made a slew of Trek characters, all the while looking for the perfect sculpt for Majel Barrett’s character from the original pilot, “The Cage”. Then another Trek fan, who became my best friend who is sitting in my spare room laughing at me right now, found her. The perfect Number One. On ebay, she’d purchased a 2007 Queen of Hearts, and dressed her in a Kirk uniform she’d altered to fit the Model Muse body.
I was sceptical at first, until I bought my own. After boil-washing her hair and putting her in my own altered Kirk uniform, I was hooked. Not only was the sculpt perfect for the character, she was gorgeous. I started collecting dolls with the Tango (aka New Hispanic) sculpt to make over into Number One dolls, but only the Queen of Hearts and the 2004 FAO Schwarz Tango Giftset dolls had the black hair and pale skin I was looking for.
I bought brushes and paints and began teaching myself to repaint, just so I could paint their eyes blue.
I joined the Barbie Fan Club, and started sharing photos of my custom dolls. I started rebodying my Number One dolls onto articulated bodies. But I kept insisting I was not becoming one of those “scary doll people”.
Oh how my friends laughed. But I swore that no, no… this was just me finding a hobby I could enjoy using my hands, as opposed to only working digitally since the 1990s! I wouldn’t be a “scary doll person” unless, I actually started making dioramas. As long as I resisted making a diorama, I was still not scary at all. A little obsessive, but not scary.
I wasn’t always a “doll person”. Sure, I had Sindy and Barbie dolls as a child. As a matter of fact, I used to create elaborate settings for them thanks to a 2-shelf cupboard next to my bed in my childhood bedroom. I never had any Barbie doll houses, so that cupboard, and the area beneath my white, girly corner desk, were routinely transformed into Barbie flats thanks to shoeboxes and folded pillow slips for beds, with face flannels for blankets. I would steal the cardboards out of my father’s dry cleaned shirts, and routinely make dresses out of socks, dish rags, anything I could get my hands on.
But by my late teens, I’d set my dolls aside, sold them off at rummage sales, left them with the children I looked after. Left them behind, as I found new outlets for my creative energy. I began writing short stories for media fanzines, attending science fiction conventions, and after I was taught the basics of HTML at university back in 1994, building dozens of fan websites for TV series I loved.
As an adult, between web design gigs and temping, I worked as a freelance journalist–first in fandom, then in print magazines. By the summer of 2004, I was one of the editors of a pop culture website called MediaSharx, published by half of the original team behind a popular news site called Zentertainment. And my publisher wanted articles for a proposed 80s Month.
I have been–and will always be–a huge animation geek, and two of my all-time favourites of the 1980s was Jem, which was the soap opera of my tween and teen years. I immediately proposed an interview with Christy Marx, who had developed the series for television and written the lion’s share of the episodes.
It was interviewing Christy that pretty much changed my life.
The first two series of Jem had just been released by Rhino on dvd, and like a good little journo who does her homework, I bought the dvds and watched all the special features, including interviews and commentaries from Marx, to make sure I wasn’t asking her any questions that she’d answered publically dozens of times. I also read through the archives of the Truly Outrageous mailing list, where Christy was a frequent poster.
I compiled my question list, arranged the interview, and then had a fantastic 45 minute phoner with the amazingly talented Marx. Though the interview was focussed on the Jem animated series, we did talk about the line of Hasbro dolls, and Christy told me that there was a small but dedicated fanbase who still collected the dolls, fashions, playsets and other licensed products.
I was amazed; I’d had no idea that doll collected was such “a thing”.
(Laugh all you want; at the time, I was a complete and total neophyte.)
I joined the Truly Outrageous mailing list and a message board called “Jem & Friends”, to publicise the article. And, because I had taken the dvds with me to my sister’s and rewatched the entire dvd box set, my passion for Jem was reignited.
I bought two MIB Stormer dolls, as she was my favourite character, and gave one to my sister. I kept mine in her “on stage” fashion for years, displayed proudly on my bookcase, and posted to the list and board now and then, even after the interview was posted in September, 2004.
Then I found out one of the Jem & Friends board members was planning a one-day gathering in Minneapolis that she dubbed “JemCon”. That first JemCon was tiny, but it spawned an annual convention. I took my mother and sister to JemCon 2006, which was being held in Orlando near where they lived. At the con, I met some Chicago area fans, and was talked into helping to put together Chicago’s bid for JemCon 2007.
Thus began my long, slow slide into becoming a “doll person”.


 Dioramas sneaked up on me. By the summer of 2010, I was bookmarking dioramas on Flickr and trying to resist the siren call of 1:8 (Playscale) and 1:6 furniture. Then one fateful night, I kinda sorta accidently made a bed. I didn’t mean to! It just sort of happened. The frame was foamcore, and the pillows were pieces of cushion covered in fabric from a pair of opaque nylon tights. The beadspread was a piece of cushion cover I sewed to size while sitting on my sofa, watching telly.